The Ultimate Homemade No-Churn Chocolate Chip Ice Cream
There is nothing quite like dipping your spoon into a freshly scooped bowl of rich, creamy ice cream on a warm sunny afternoon. Ice cream is the ultimate universal comfort food, loved by generations across the United States and beyond. But for many home cooks, the dream of making restaurant-quality ice cream at home feels out of reach because of one major roadblock: the need for an expensive, bulky electric ice cream maker that clutters up the kitchen counter.
What if we told you that you could skip the machine entirely and still achieve an incredibly silky, decadent, and velvety texture?
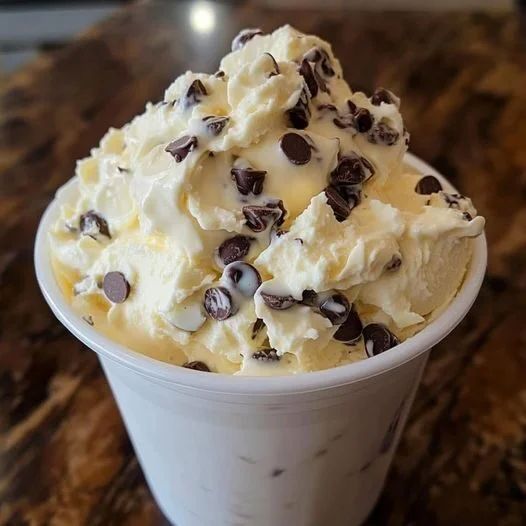
Inspired by the gorgeous, fluffy scoop packed with chocolate layers in image_0009fc.jpg, today we are breaking down the absolute best Homemade No-Churn Chocolate Chip Ice Cream recipe. This comprehensive guide will walk you through the food science behind no-churn methods, the essential high-quality ingredients you need, step-by-step assembly instructions, crucial troubleshooting tips, and creative flavor variations to turn your kitchen into an artisanal scoop shop.
The Food Science: How No-Churn Ice Cream Works
To understand why this recipe yields such an exceptional texture without an ice cream machine, we have to look closely at the science of freezing dairy. Traditional ice cream relies on an electric churner to perform two critical tasks simultaneously: incorporating air (known as “overrun”) and breaking up ice crystals as the liquid cream freezes. Without churning, freezing a standard cream mixture would result in a rock-hard, icy block that is impossible to scoop.
The genius of the no-churn method lies in its two primary anchor ingredients: Heavy Whipping Cream and Sweetened Condensed Milk.
1. Whipping the Air In Mechanically
Instead of relying on a machine to pump air into the mixture slowly over 30 minutes, we pre-whip heavy cream into stiff peaks using a standard hand mixer or stand mixer. By whipping the cream first, we trap millions of micro-air bubbles inside the dairy fat structure. This mechanical aeration provides the fluffy, light, and airy volume that you see piled high in the cup within image_0009fc.jpg.
2. Lowering the Freezing Point with Sugar
Sweetened condensed milk is a concentrated form of milk where roughly 60% of the water content has been evaporated away, and sugar has been added. Because water expands and forms harsh ice crystals when frozen, reducing the water content drastically minimizes iciness. Furthermore, the high concentration of dissolved sugar acts as a natural antifreeze. Sugar lowers the freezing point of the liquid, ensuring that even when stored in a freezing home environment, the ice cream remains beautifully soft, scoopable, and smooth.
🛒 The Ultimate Ingredient Breakdown
To recreate the exact masterpiece shown in image_0009fc.jpg, you only need a handful of accessible, budget-friendly pantry staples. However, because this recipe relies on very few components, the quality of each ingredient will heavily impact the final flavor profile.
1. Heavy Whipping Cream (2 Cups / 16 oz)
Look for heavy cream or heavy whipping cream with a minimum fat content of 36% to 40%. Do not use light cream, half-and-half, or whole milk, as they contain too much water and too little fat, which will lead to a gritty, icy texture. The high fat content is what gives this ice cream its luxurious mouthfeel.
2. Sweetened Condensed Milk (1 Can / 14 oz)
Ensure you buy Sweetened Condensed Milk and not evaporated milk. Evaporated milk does not contain the necessary sugar content to prevent hard freezing and will ruin the consistency. Keep the can in the refrigerator before using to help keep the entire mixture cold during preparation.
3. Pure Vanilla Extract (2 Teaspoons)
A high-quality pure vanilla extract or vanilla bean paste acts as the background flavor foundation. Beyond flavor, alcohol-based vanilla extracts also contribute slightly to keeping the ice cream soft, as alcohol does not freeze.
4. Semi-Sweet Mini Chocolate Chips (1 Cup)
As beautifully illustrated in image_0009fc.jpg, the chocolate chips are the star of the show. We highly recommend using mini chocolate chips rather than standard-sized ones. Standard chips become incredibly hard and painful to chew when completely frozen. Mini chips, or finely chopped chocolate shards from a high-quality baking bar, melt effortlessly on your tongue right alongside the velvety cream.
🥣 Equipment You Will Need
- A large glass or stainless steel mixing bowl (Chilled in the freezer for 10 minutes)
- An electric hand mixer or a stand mixer fitted with a whisk attachment
- A silicone spatula for gentle folding
- A standard 9×5-inch metal loaf pan or an airtight freezer-safe container
- Plastic cling wrap or parchment paper
Step 1: Prep and Chill Your Kitchen Tools
Before opening a single ingredient, place your mixing bowl, your mixer beaters, and your metal loaf pan into the freezer for at least 10 to 15 minutes. Keeping your tools ice-cold prevents the heavy cream from heating up due to the friction of the mixer blades, ensuring you get maximum volume and stiff peaks quickly.
Step 2: Whip the Heavy Cream to Stiff Peaks
Pour your cold heavy whipping cream into the chilled mixing bowl. Start your electric mixer on a low speed to avoid splattering, then gradually increase the speed to medium-high. Whip the cream continuously for about 3 to 5 minutes. Watch the texture closely: it will transition from liquid to soft bubbles, then to soft waves, and finally to stiff peaks. You know it is ready when you lift the beaters straight up and the cream holds its sharp shape without collapsing back into the bowl. Be careful not to over-whip, or the dairy will separate into butter and buttermilk!
Step 3: Combine Vanilla and Condensed Milk
In a separate medium-sized bowl, pour out the entire 14-ounce can of sweetened condensed milk. Add the two teaspoons of pure vanilla extract directly into the condensed milk and stir with a spoon until the vanilla is fully incorporated into the thick, golden syrup.
Step 4: The Delicate Folding Technique
This is the most critical step of the entire process. Pour about one-third of your whipped cream into the bowl with the sweetened condensed milk. Using a silicone spatula, gently slice down through the middle of the mixture, sweep around the bottom of the bowl, and fold it over itself.
Once the first batch is mostly integrated, pour that mixture back into the main bowl containing the remaining two-thirds of the whipped cream. Continue folding slowly in a figure-eight motion. Do not stir or whisk violently, as doing so will deflate all the precious air bubbles you just whipped into the cream, resulting in a dense, heavy ice cream. Stop folding the moment the mixture looks uniform and smooth.
Step 5: Incorporating the Chocolate Chips
Now it’s time to recreate the stunning texture from image_0009fc.jpg. Take about three-quarters of a cup of your mini chocolate chips and gently fold them into the aerated cream base so they are evenly distributed throughout. Save the remaining quarter cup of chocolate chips to dress up the top later.
🍧 Nutrition Reference
For those keeping track of daily macro targets, here is what a standard single-scoop serving (approx. 1/2 cup) looks like:
| Nutrient | Amount Per Serving | % Daily Value |
| Calories | 290 kcal | 15% |
| Total Fat | 18g | 23% |
| Saturated Fat | 11g | 55% |
| Cholesterol | 55mg | 18% |
| Sodium | 45mg | 2% |
| Total Carbohydrates | 28g | 10% |
| Dietary Sugars | 26g | — |
| Protein | 4g | 8% |
💡 Pro-Tips for the Best No-Churn Ice Cream
To elevate your dessert game from great to absolutely legendary, implement these pro baking hacks used by professional pastry chefs:
- The Slicing Method for Mix-Ins: Instead of just dumping all your chocolate chips in, consider chopping up a high-quality chocolate bar into varied sizes. The tiny dust-like chocolate shards will tint the ice cream base slightly, while the larger chunks offer a fantastic, satisfying snap when bitten.
- Preventing the Dreaded “Freezer Taste”: If you are not consuming the entire batch within 48 hours, transfer the frozen ice cream out of an open loaf pan and into a heavy-duty, airtight plastic container with an airtight lid. This blocks the fat in the cream from absorbing ambient odors from items like frozen fish or onions in your freezer.
- Perfect Scooping Temparature: Because no-churn ice cream doesn’t contain commercial stabilizers, it melts slightly faster than store-bought varieties. Dip your ice cream scoop into a cup of warm water for 10 seconds before gliding it through the pan. This allows you to get beautiful, clean spheres that pile elegantly high into your serving cups.
🎨 Creative Flavor Variations to Try
Once you have mastered the foundational vanilla and chocolate chip technique shown in image_0009fc.jpg, you can use this exact same base to create an infinite array of custom flavor profiles. Here are a few fan-favorite upgrades:
🍫 1. Ultimate Mint Chocolate Chip
To give your ice cream a classic, refreshing parlor twist, swap out the pure vanilla extract for 1 teaspoon of pure peppermint extract. If you love the vintage look, fold in 2 to 3 drops of natural green food coloring into the sweetened condensed milk before folding it into the whipped cream.
☕ 2. Coffee Mocha Chip Crunch
For a sophisticated adult dessert, dissolve 2 tablespoons of instant espresso powder directly into the sweetened condensed milk before combining it with the dairy. Fold in dark chocolate chunks along with your mini chips for an incredible coffee-shop-inspired treat.
🥜 3. Peanut Butter & Fudge Swirl
After pouring your ice cream base into the loaf pan, warm up a quarter-cup of creamy peanut butter and a quarter-cup of hot fudge sauce in separate microwave-safe bowls until fluid. Drizzle both sauces over the top of the ice cream, then take a butter knife and drag it through the mixture in a swirling motion to create gorgeous, decadent ribbons of flavor in every bite.
🍪 4. Cookies and Cream Mashup
If you can’t get enough texture in your frozen desserts, crush 12 to 15 classic Oreo cookies inside a zip-top bag using a rolling pin. Fold the cookie crumbs and chunks right alongside the mini chocolate chips for an unforgettable hybrid flavor experience.
🛠️ Troubleshooting Common Mistakes
While this recipe is incredibly straightforward, minor variations in kitchen temperature or technique can occasionally cause hitches. Here is how to diagnose and fix any issues instantly:
Why is my ice cream dense and rock hard?
- The Cause: You likely stirred the mixture too aggressively when combining the heavy cream and the condensed milk, which deflated the trapped air bubbles. Alternatively, your heavy cream may not have been whipped to true stiff peaks.
- The Fix: Next time, ensure you use a slow, sweeping folding motion with a spatula rather than a whisk, and make sure your heavy cream holds its shape completely before mixing.
Why are there large ice crystals inside the base?
- The Cause: Moisture or condensation found its way into the container while freezing, or you used a low-fat dairy option like whole milk or half-and-half.
- The Fix: Stick strictly to 36%+ heavy whipping cream and make sure you press your plastic wrap directly against the wet surface of the cream before popping the container into the freezer to form a tight, protective seal.
Why is my cream separating into a curdled texture while mixing?
- The Cause: You over-whipped the heavy cream. If you keep running your mixer past the stiff peak stage, the fat globules clump together to form solid butter, separating from the liquid whey.
- The Fix: Keep a close eye on your bowl during Step 2. As soon as the cream stops running and looks structural, turn off the mixer immediately. If it has completely turned to butter, you will need to start fresh with a new carton of cold cream.
🍨 Final Thoughts: Bring the Scoop Shop Home
Making premium, indulgent desserts at home shouldn’t require complex gadgets or hours of manual labor. This no-churn chocolate chip ice cream method proves that with simple food science and quality ingredients, you can make a treat that rivals any gourmet shop in America.
As you can see from the fluffy texture and gorgeous topping in image_0009fc.jpg, the results speak for themselves. It’s rich, customizable, fun to make with kids, and incredibly rewarding to pull out of the freezer when entertaining guests. Grab your mixing bowls, chill your pans, and start creating your own perfect batch today!
Don’t forget to bookmark this recipe page, share it with fellow dessert lovers on Pinterest and Facebook, and comment down below to let us know which custom mix-ins you tried in your kitchen!